This is a simple straightforward tutorial on how to use iToolPaw iGPSGo for iOS17.
iToolPaw iGPSGo Pokemon Go iOS Solutions (fix failed to detect location 12)
Note: If you have already installed POGO on your iPhone, please uninstall it first.
Step 1: Download Sideloadly on Windows or Mac
Windows 64-bit Download — Windows 32-bit Download — macOS Download
Windows users please make sure you have the iTunes & iCloud installed.
iTunes x64 – iTunes x32 – iCloud web Apple download link
Step 2: Download pogo.ipa file
https://drive.google.com/drive/u/0/folders/12hJ-6PzndfuSiFDWpi_Uv-Bpr_bW3dTj
Step 3: Make sure you already open developer mode on your iPhone with iGPSGo.

Step 4: install Sideloadly. Open it and connect your iPhone to PC with usb cable. Choose the igpsgo.ipa file. Enter your Apple ID to sign the ipa file.
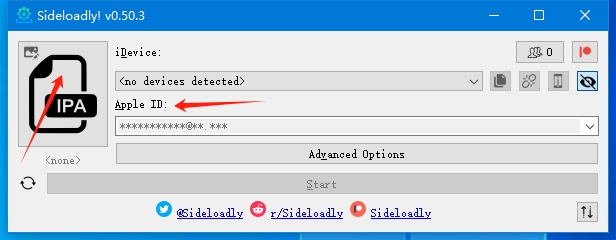
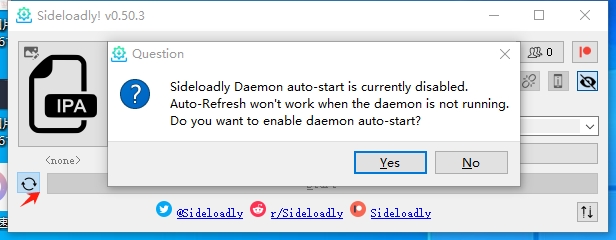
A normal & free Apple Developer account only allows the app to function for 7 days. After 7 days you can sideload it again using the same Apple ID. You can enable auto refresh.
Step 5: if you see “untrusted developer” when you open the pokemon go ipa on your iPhone

Step 6: Start use iGPSGo to change location in Pokemon Go now.
Step 1: Download and install iToolPaw iGPSGo location changer on your computer.
For the first connection, you need to enable Developer Mode for iOS 16 or enable USB Debugging on Android.
Connect iOS devices
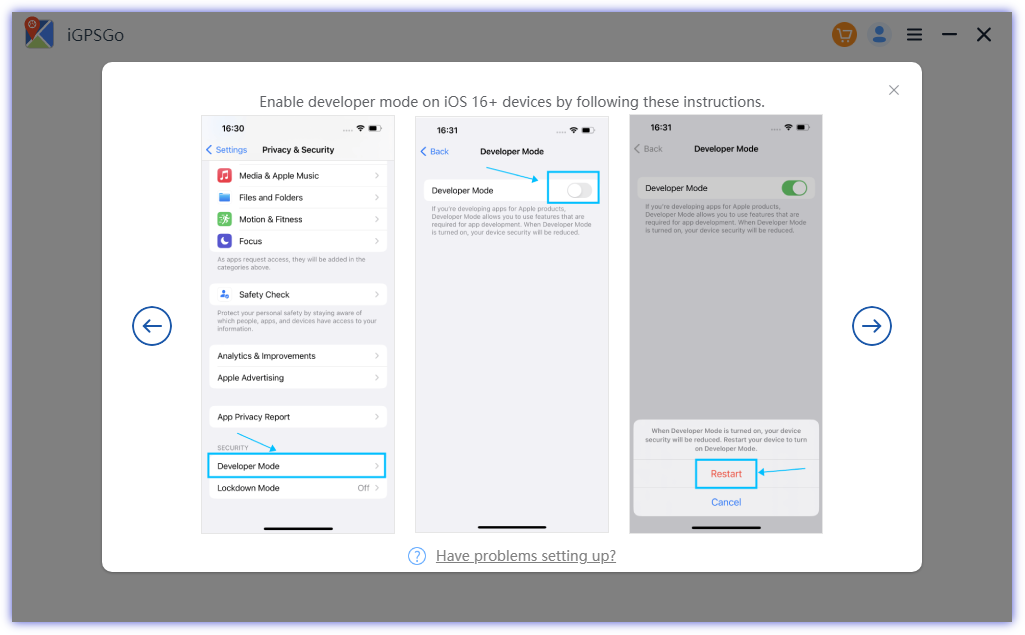
Note: iGPSGo now supports the latest iOS 16 version. If your device is running iOS 16, please enable “Developer Mode”. However, if your device is running iOS 15 or an earlier version, you can disregard this step and proceed.
How to Enable the “Developer Mode” on iOS 16 Device:
After connecting your device with iGPSGo, the iGPSGo interface will display a guide, please follow the guide to enable “Developer Mode” on your device. Can not see “Develop Mode” option? Connect iPhone with iGPSGo, refresh the Privacy & Security option, you will see develop mode option.

Once turn on the “Developer Mode” toggle, you are required to restart the device. After it restarts completely, click “Turn On” and unlock with the password on your device.
Connect Android devices
Enable USB debugging on Android device
Once you’ve connected Android device to PC via USB, scoll down the notification bar and choose the Transferring Files option under the USB connection mode.
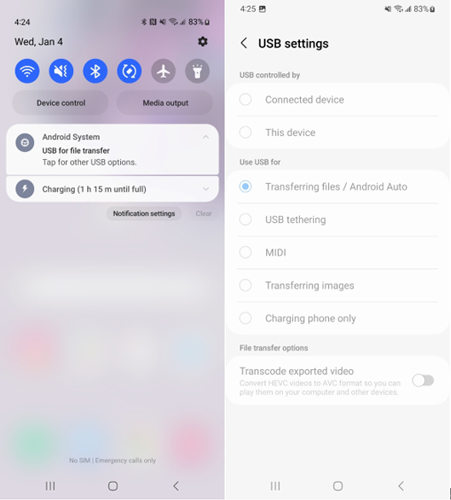
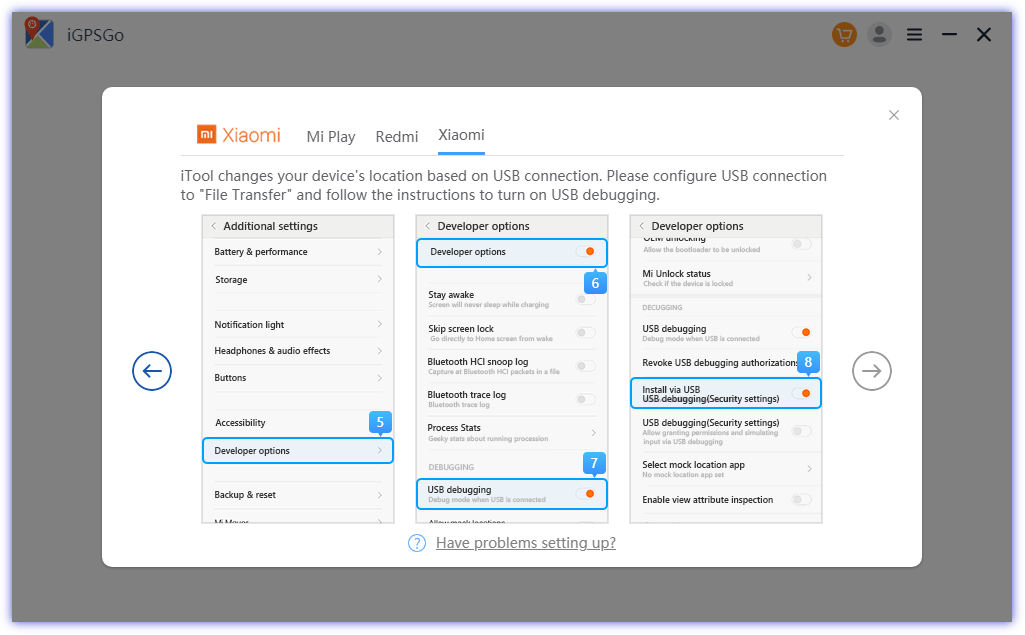
Next, Got to Settings > Search Build Number > Tap Build Number 7 times to enable developer mode > Enable USB debugging under the developer option.
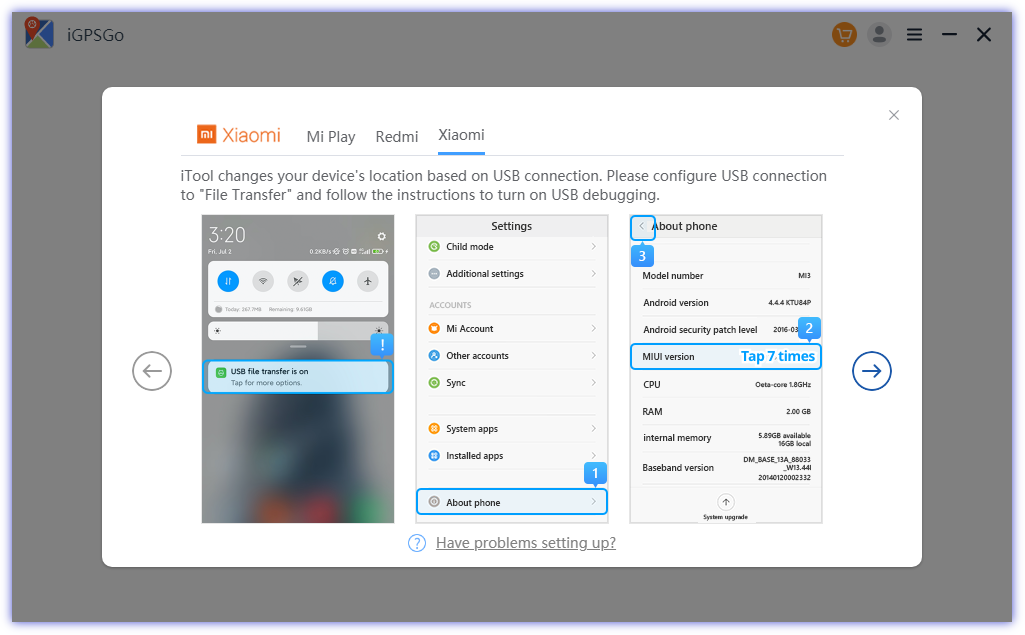
Note: For Xiaomi devices, you should also enable Install via USB under Deveoper options.
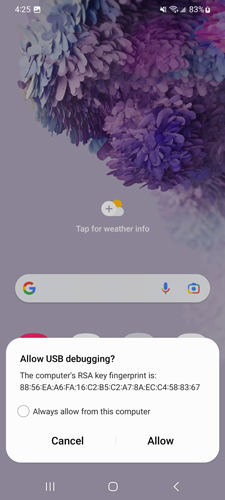
Confirm USB Debugging
Now, your Android deivce will pop-up a windows asking you if you want to allow USB debugging. Click “Allow” to move on.
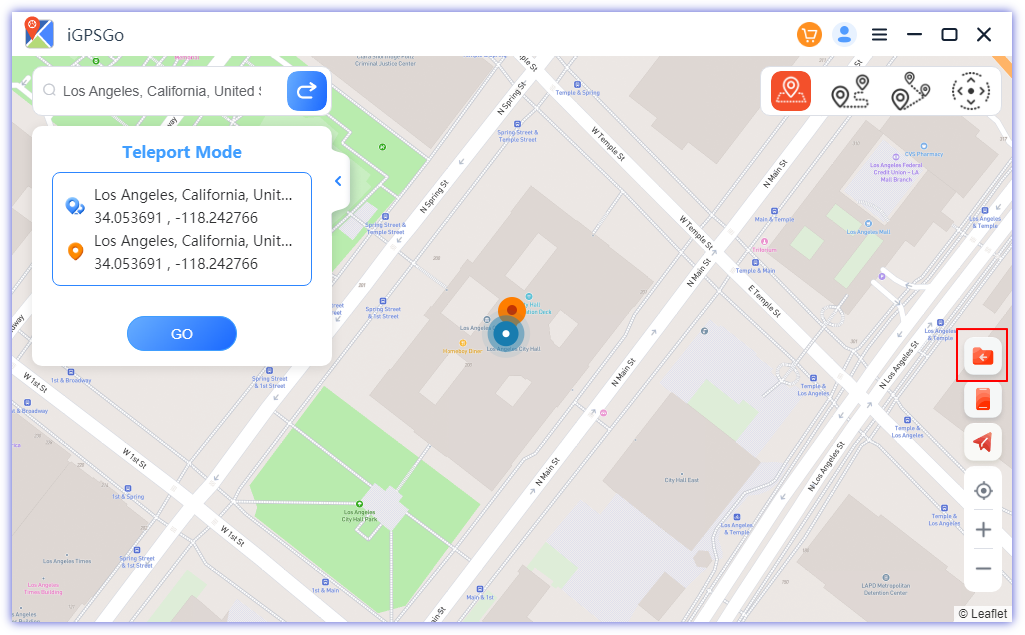
1. Teleport Mode
You can teleport your GPS location to anywhere you want to go. It supports social apps like Snapchat, Life360, Tinder, Bumble, Grindr, WeChat, Telegram, WhatsApp etc. It supports location based games like Pokemon Go, Monster Hunter Now, ingress prime, Orna rpg, Mobile Legends etc.
Step 1: Once the connection is established, you will be presented with a map on the following page, displaying your current location. If the displayed location is inaccurate, simply click on the “Arrow” icon to obtain the correct and precise location information.
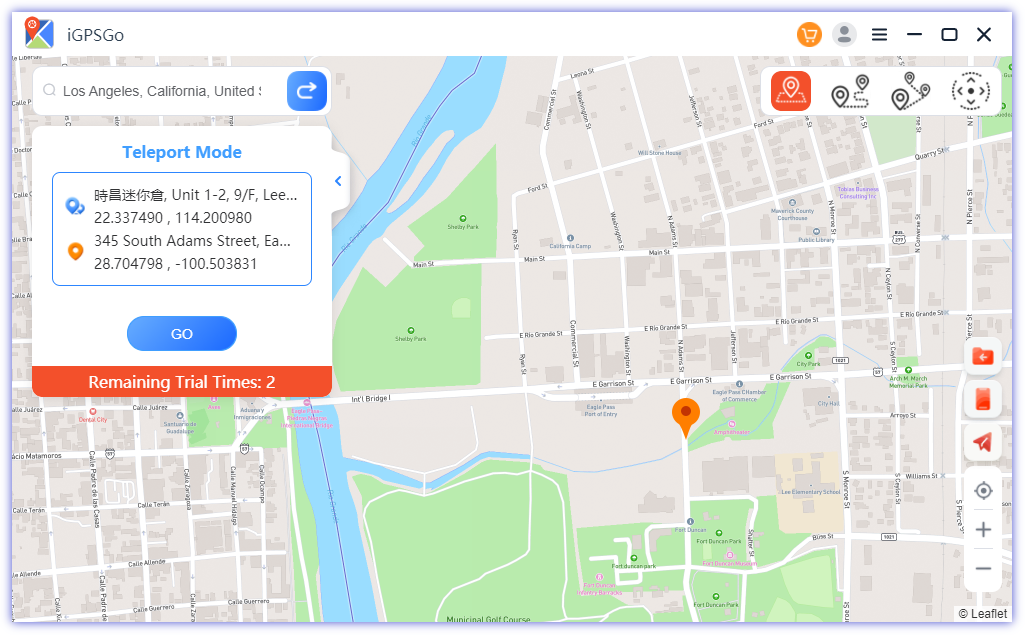
Step 2: Enter the location you’d like to teleport to. Click “Search”. You can also click the desired location on the map.
Step 3: The map will show the new desired location. Click “Go” to teleport in Pokemon Go.
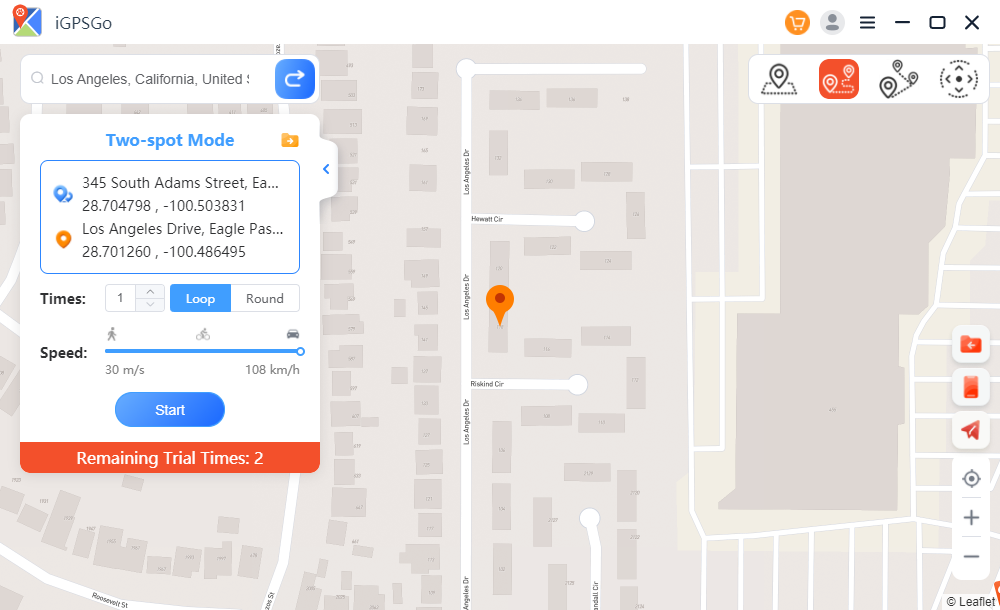
2. Simulate Movement with Two-Spot Mode
You can also use iGPSGo to simulate GPS movement between two pre-determined locations. You can plan your Pokemon Go auto walking with this feature.
Step 1: Click on “Two-spot mode” in the upper right corner. Select the place you would like to move on the map.
Set the speed you would like to use. Besides, you can choose walking, cycling, or driving speed. Click “Start”.
3. Simulate Movement with Multi-Spot Mode
If you have a need to navigate through multiple places on the map, opting for the multi-spot mode is the way to go.
Step 1: Locate the multi-spot mode option in the upper right corner of the screen. Then, proceed to select all the desired locations you wish to pass through on your journey.
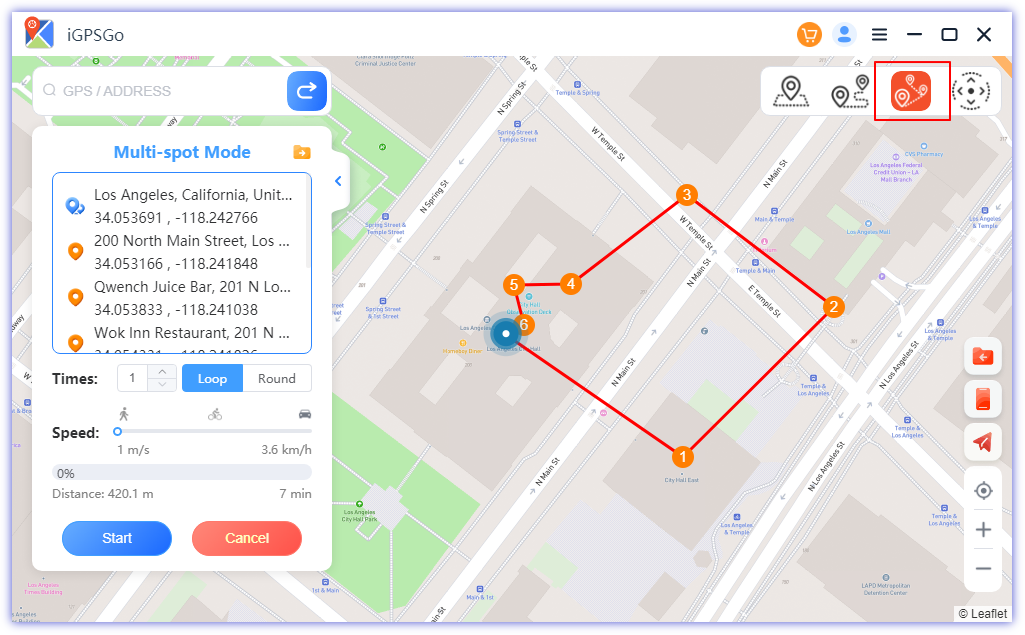
Step 2: Indicate the number of loops or rounds you desire to move along the chosen path and locations and then click “Start” to start the simulated movement.
As a result, your device’s GPS will commence its journey along the designated path, sequentially passing through all the selected points at the designated speed.
4. GPS Joystick Mode
The Pokemon Go joystick mode in iGPSGo provides real-time control over the direction when manipulating the GPS.
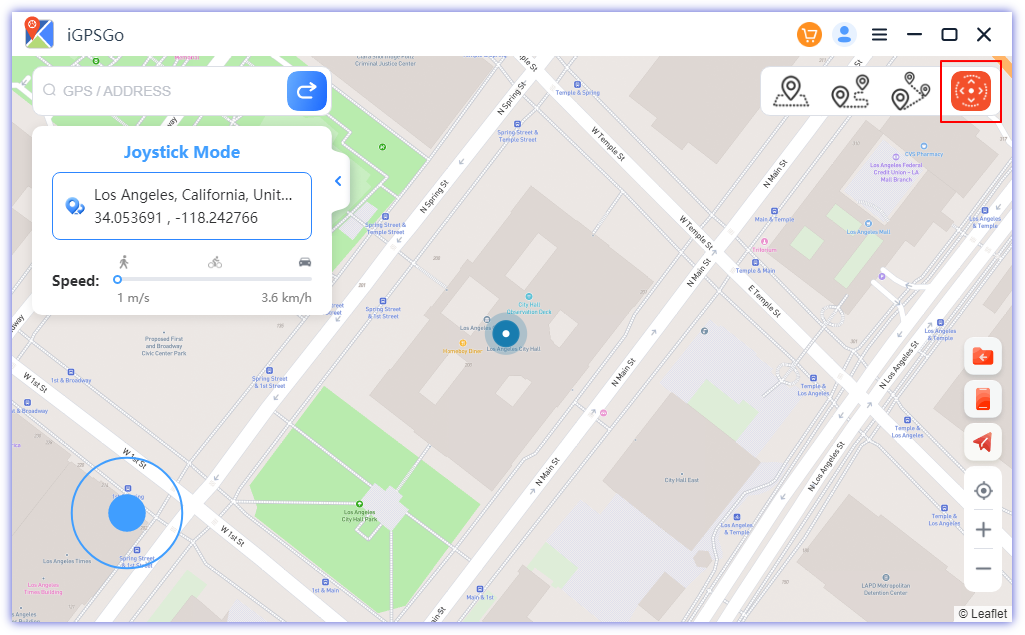
You can then employ the following actions to change direction as needed:
- Click on the left or right arrow.
- Drag the spot around the circle.
- Press the A and D keys on your keyboard.
- Press the left and right arrow keys on your keyboard.
5. Import GPX routes file to autowalk
By importing GPX files in Pokemon Go, we can conveniently and efficiently utilize featured routes, enabling quick access to predefined routes and their associated information. You can easily hatch Pokemon Go eggs without walking with GPX file.
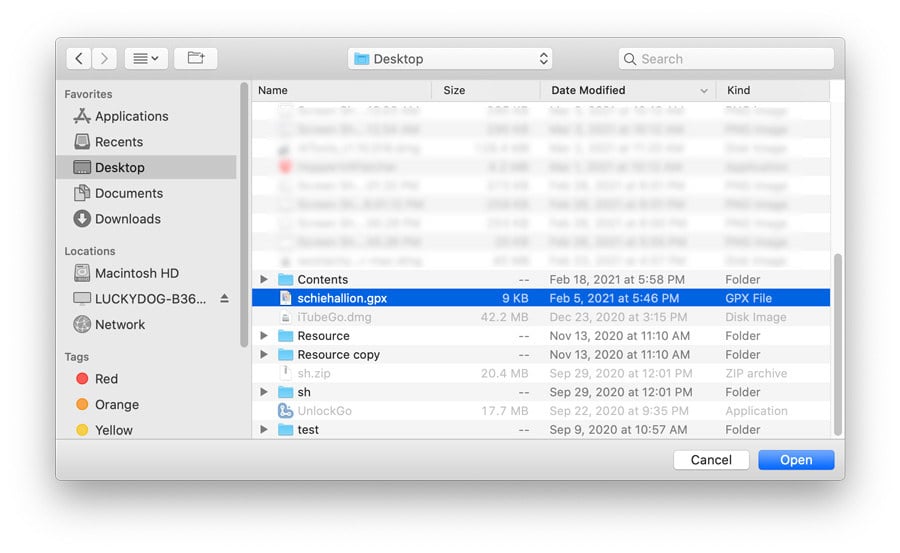
Step 1. Click the GPX icon in the bottom right corner of iGPSGo.
Step 2. Choose the GPX file you want to use and import it to iGPSGo.
6. Control multiple iOS devices at the same time
iGPSGo can manage multiple iOS devices at the same time
Step 1. Click the icon of “Manage Multiple devices” in the bottom right corner of iGPSGo.
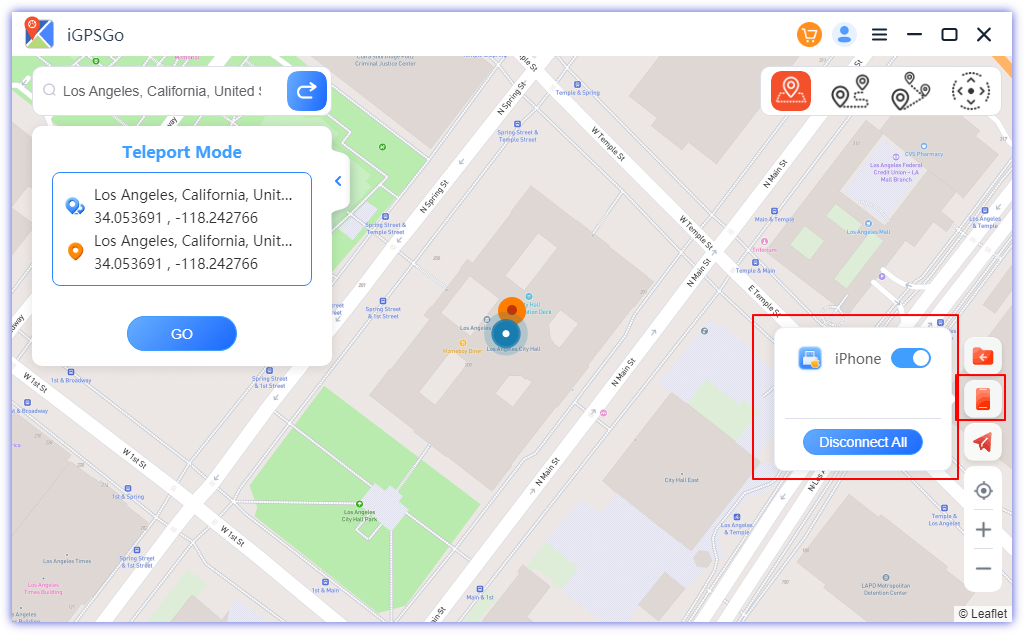
Once you access the interface, you will be able to view a list of all connected devices along with their respective status, which can be either “Controlled” or “Uncontrolled.”
To change the status from “Controlled” to “Uncontrolled” or vice versa, you can easily accomplish this by clicking the corresponding “Controlled” or “Uncontrolled” button.

William Hanger is a veteran Pokémon GO player with a passion that dates back to the game’s launch in 2016. Having accumulated vast experience and expertise in the world of Pokémon GO Fake GPS, she already tested 20+ Fake GPS app.